目录
代码规范化与自动化工具实践
本文详细介绍了如何在 Vite 项目 中集成和配置 代码规范化与自动化工具,以提高代码质量和开发效率。通过使用 Prettier、ESLint、Stylelint 进行代码格式化和校验,结合 husky、lint-staged、commitlint 和 commitizen 等工具来规范 Git 提交流程,确保团队协作的一致性和代码的规范性。
- 使用
Prettier统一格式化代码,集成ESLint、Stylelint代码校验规范 - 使用
husky、lint-staged、commitlint、czg、cz-git规范提交信息
开始配置
以下是在 Vite 项目中实现
代码规范化与自动化工具的步骤,以 TypeScript(ts)为例:
一、初始化 Vite 项目
在命令行中执行以下命令,初始化一个 Vite 项目,并选择 TypeScript 作为项目的语言:
bash# 创建项目
npm create vite@latest auto-code-standardization -- --template vue-ts
# 切换目录
cd auto-code-standardization
# 安装依赖
npm install
# 运行项目
npm run dev
二、安装依赖
- 在项目根目录下,安装
**Prettier**、**ESLint**、**Stylelint**以及相关的插件和配置:
(1)安装 Prettier
bashnpm install --save-dev prettier
(2)安装 ESLint 及相关插件
bash# 一句话安装
npm install --save-dev eslint@^8.57.0 eslint-config-prettier@^9.1.0 eslint-plugin-prettier@^5.1.3 eslint-plugin-vue@^9.22.0 @typescript-eslint/eslint-plugin@^7.1.0 @typescript-eslint/parser@^7.1.0

#分开安装
# 安装 ESLint
npm install --save-dev eslint@^8.57.0

# 安装 eslint-config-prettier
npm install --save-dev eslint-config-prettier@^9.1.0

# 安装 eslint-plugin-prettier
npm install --save-dev eslint-plugin-prettier@^5.1.3

# 安装 eslint-plugin-vue
npm install --save-dev eslint-plugin-vue@^9.22.0

# 安装 @typescript-eslint/eslint-plugin
npm install --save-dev @typescript-eslint/eslint-plugin@^7.1.0

# 安装 @typescript-eslint/parser
npm install --save-dev @typescript-eslint/parser@^7.1.0
(3)安装 Stylelint 及相关插件
bash# 一句话安装
npm install --save-dev stylelint@^16.1.0 stylelint-config-html@^1.1.0 stylelint-config-recess-order@^5.0.0 stylelint-config-recommended-scss@^14.0.0 stylelint-config-recommended-vue@^1.5.0 stylelint-config-standard@^36.0.0 stylelint-config-standard-scss@^13.0.0

#分开安装
# 安装 stylelint
npm install --save-dev stylelint@^16.1.0

# 安装 stylelint-config-html
npm install --save-dev stylelint-config-html@^1.1.0

# 安装 stylelint-config-recess-order
npm install --save-dev stylelint-config-recess-order@^5.0.0

# 安装 stylelint-config-recommended-scss
npm install --save-dev stylelint-config-recommended-scss@^14.0.0

# 安装 stylelint-config-recommended-vue
npm install --save-dev stylelint-config-recommended-vue@^1.5.0

# 安装 stylelint-config-standard
npm install --save-dev stylelint-config-standard@^36.0.0

# 安装 stylelint-config-standard-scss
npm install --save-dev stylelint-config-standard-scss@^13.0.0
(4)安装 husky 和 lint-staged
bashnpm install --save-dev husky lint-staged
(5)安装 commitlint 及相关插件
bashnpm install --save-dev @commitlint/cli@^18.4.3 @commitlint/config-conventional@^18.4.3
(6)安装 czg
bashnpm install --save-dev czg@1.9.0
(7)安装 cz-git
bashnpm install --save-dev cz-git@1.9.0
三、配置
1、配置ESLint
(1)在项目根目录下创建 .eslintrc.cjs 文件,并配置 ESLint 规则和插件:
jsx// @see: http://eslint.cn

module.exports = {
  root: true,
  env: {
    browser: true,
    node: true,
    es6: true
  },
  // 指定如何解析语法
  parser: "vue-eslint-parser",
  // 优先级低于 parse 的语法解析配置
  parserOptions: {
    parser: "@typescript-eslint/parser",
    ecmaVersion: 2020,
    sourceType: "module",
    jsxPragma: "React",
    ecmaFeatures: {
      jsx: true
    }
  },
  // 继承某些已有的规则
  extends: ["plugin:vue/vue3-recommended", "plugin:@typescript-eslint/recommended", "plugin:prettier/recommended"],
  /**
   * "off" 或 0    ==>  关闭规则
   * "warn" 或 1   ==>  打开的规则作为警告(不影响代码执行)
   * "error" 或 2  ==>  规则作为一个错误(代码不能执行,界面报错)
   */
  rules: {
    // eslint (http://eslint.cn/docs/rules)
    "no-var": "error", // 要求使用 let 或 const 而不是 var
    "no-multiple-empty-lines": ["error", { max: 1 }], // 不允许多个空行
    "prefer-const": "off", // 使用 let 关键字声明但在初始分配后从未重新分配的变量,要求使用 const
    "no-use-before-define": "off", // 禁止在 函数/类/变量 定义之前使用它们

    // typeScript (https://typescript-eslint.io/rules)
    "@typescript-eslint/no-unused-vars": "error", // 禁止定义未使用的变量
    "@typescript-eslint/no-empty-function": "error", // 禁止空函数
    "@typescript-eslint/prefer-ts-expect-error": "error", // 禁止使用 @ts-ignore
    "@typescript-eslint/ban-ts-comment": "error", // 禁止 @ts-<directive> 使用注释或要求在指令后进行描述
    "@typescript-eslint/no-inferrable-types": "off", // 可以轻松推断的显式类型可能会增加不必要的冗长
    "@typescript-eslint/no-namespace": "off", // 禁止使用自定义 TypeScript 模块和命名空间
    "@typescript-eslint/no-explicit-any": "off", // 禁止使用 any 类型
    "@typescript-eslint/ban-types": "off", // 禁止使用特定类型
    "@typescript-eslint/no-var-requires": "off", // 允许使用 require() 函数导入模块
    "@typescript-eslint/no-non-null-assertion": "off", // 不允许使用后缀运算符的非空断言(!)

    // vue (https://eslint.vuejs.org/rules)
    "vue/script-setup-uses-vars": "error", // 防止<script setup>使用的变量<template>被标记为未使用,此规则仅在启用该 no-unused-vars 规则时有效
    "vue/v-slot-style": "error", // 强制执行 v-slot 指令样式
    "vue/no-mutating-props": "error", // 不允许改变组件 prop
    "vue/custom-event-name-casing": "error", // 为自定义事件名称强制使用特定大小写
    "vue/html-closing-bracket-newline": "error", // 在标签的右括号之前要求或禁止换行
    "vue/attribute-hyphenation": "error", // 对模板中的自定义组件强制执行属性命名样式:my-prop="prop"
    "vue/attributes-order": "off", // vue api使用顺序,强制执行属性顺序
    "vue/no-v-html": "off", // 禁止使用 v-html
    "vue/require-default-prop": "off", // 此规则要求为每个 prop 为必填时,必须提供默认值
    "vue/multi-word-component-names": "off", // 要求组件名称始终为 “-” 链接的单词
    "vue/no-setup-props-destructure": "off" // 禁止解构 props 传递给 setup
  }
};
(2)在项目根目录下创建一个名为 .eslintignore 的文件,用来指定 ESLint 忽略检查的文件或目录。例如:
jsx*.sh
node_modules
*.md
*.woff
*.ttf
.vscode
.idea
dist
/public
/docs
.husky
.local
/bin
/src/mock/*
stats.html
(3)在 package.json 文件中添加一些相关的 npm 脚本,以便你可以在项目中运行 ESLint。例如:
- 你可以在项目中运行
npm run lint:eslint命令来检查或修复代码的规范性。
jsx"scripts": {
  "lint:eslint": "eslint --fix --ext .js,.ts,.vue ./src",
},
2、配置 prettier
(1)在项目根目录下创建 .prettierrc.cjs 文件,并配置 prettier 规则:
jsx// @see: https://www.prettier.cn

module.exports = {
  // 指定最大换行长度
  printWidth: 130,
  // 缩进制表符宽度 | 空格数
  tabWidth: 2,
  // 使用制表符而不是空格缩进行 (true:制表符,false:空格)
  useTabs: false,
  // 结尾不用分号 (true:有,false:没有)
  semi: true,
  // 使用单引号 (true:单引号,false:双引号)
  singleQuote: false,
  // 在对象字面量中决定是否将属性名用引号括起来 可选值 "<as-needed|consistent|preserve>"
  quoteProps: "as-needed",
  // 在JSX中使用单引号而不是双引号 (true:单引号,false:双引号)
  jsxSingleQuote: false,
  // 多行时尽可能打印尾随逗号 可选值"<none|es5|all>"
  trailingComma: "none",
  // 在对象,数组括号与文字之间加空格 "{ foo: bar }" (true:有,false:没有)
  bracketSpacing: true,
  // 将 > 多行元素放在最后一行的末尾,而不是单独放在下一行 (true:放末尾,false:单独一行)
  bracketSameLine: false,
  // (x) => {} 箭头函数参数只有一个时是否要有小括号 (avoid:省略括号,always:不省略括号)
  arrowParens: "avoid",
  // 指定要使用的解析器,不需要写文件开头的 @prettier
  requirePragma: false,
  // 可以在文件顶部插入一个特殊标记,指定该文件已使用 Prettier 格式化
  insertPragma: false,
  // 用于控制文本是否应该被换行以及如何进行换行
  proseWrap: "preserve",
  // 在html中空格是否是敏感的 "css" - 遵守 CSS 显示属性的默认值, "strict" - 空格被认为是敏感的 ,"ignore" - 空格被认为是不敏感的
  htmlWhitespaceSensitivity: "css",
  // 控制在 Vue 单文件组件中 <script> 和 <style> 标签内的代码缩进方式
  vueIndentScriptAndStyle: false,
  // 换行符使用 lf 结尾是 可选值 "<auto|lf|crlf|cr>"
  endOfLine: "auto",
  // 这两个选项可用于格式化以给定字符偏移量(分别包括和不包括)开始和结束的代码 (rangeStart:开始,rangeEnd:结束)
  rangeStart: 0,
  rangeEnd: Infinity
};
(2)在项目根目录创建 .prettierignore 文件,用于指定 Prettier 忽略格式化的内容。
jsx/dist/*
.local
/node_modules/**

**/*.svg
**/*.sh

/public/*
stats.html
(3)在 package.json 文件中添加一些相关的 npm 脚本,以便你可以在项目中运行 prettier。例如:
- 你可以在项目中运行
npm run lint:prettier命令来检查或修复代码的规范性。
jsx"scripts": {
  "lint:prettier": "prettier --write \"src/**/*.{js,ts,json,tsx,css,less,scss,vue,html,md}\""
}
3、配置 Stylelint
(1)在项目根目录下创建 .stylelintrc.cjs 文件,并配置 Stylelint 规则和插件:
jsx// @see: https://stylelint.io

module.exports = {
  root: true,
  // 继承某些已有的规则
  extends: [
    "stylelint-config-standard", // 配置 stylelint 拓展插件
    "stylelint-config-html/vue", // 配置 vue 中 template 样式格式化
    "stylelint-config-standard-scss", // 配置 stylelint scss 插件
    "stylelint-config-recommended-vue/scss", // 配置 vue 中 scss 样式格式化
    "stylelint-config-recess-order" // 配置 stylelint css 属性书写顺序插件,
  ],
  overrides: [
    // 扫描 .vue/html 文件中的 <style> 标签内的样式
    {
      files: ["**/*.{vue,html}"],
      customSyntax: "postcss-html"
    }
  ],
  rules: {
    "function-url-quotes": "always", // URL 的引号 "always(必须加上引号)"|"never(没有引号)"
    "color-hex-length": "long", // 指定 16 进制颜色的简写或扩写 "short(16进制简写)"|"long(16进制扩写)"
    "rule-empty-line-before": "never", // 要求或禁止在规则之前的空行 "always(规则之前必须始终有一个空行)"|"never(规则前绝不能有空行)"|"always-multi-line(多行规则之前必须始终有一个空行)"|"never-multi-line(多行规则之前绝不能有空行)"
    "font-family-no-missing-generic-family-keyword": null, // 禁止在字体族名称列表中缺少通用字体族关键字
    "scss/at-import-partial-extension": null, // 解决不能使用 @import 引入 scss 文件
    "property-no-unknown": null, // 禁止未知的属性
    "no-empty-source": null, // 禁止空源码
    "selector-class-pattern": null, // 强制选择器类名的格式
    "value-no-vendor-prefix": null, // 关闭 vendor-prefix (为了解决多行省略 -webkit-box)
    "no-descending-specificity": null, // 不允许较低特异性的选择器出现在覆盖较高特异性的选择器
    "value-keyword-case": null, // 解决在 scss 中使用 v-bind 大写单词报错
    "selector-pseudo-class-no-unknown": [
      true,
      {
        ignorePseudoClasses: ["global", "v-deep", "deep"]
      }
    ]
  },
  ignoreFiles: ["**/*.js", "**/*.jsx", "**/*.tsx", "**/*.ts"]
};
(2)在项目根目录创建 .stylelintignore 文件,用于指定 stylelintignore 你希望忽略的文件或目录。
jsx/dist/*
/public/*
public/*
stats.html
(3)在 package.json 文件中添加一些相关的 npm 脚本,以便你可以在项目中运行 Stylelint。例如:
- 你可以在项目中运行
npm run lint:stylelint命令来检查或修复代码的规范性。
jsx"scripts": {
 "lint:stylelint": "stylelint --cache --fix \"**/*.{vue,less,postcss,css,scss}\" --cache --cache-location node_modules/.cache/stylelint/"
}
4、配置lint-staged
(1)简洁
lint-staged:是一个前端文件过滤的工具。是一个仅仅过滤出Git代码暂存区文件(被 committed 的文件)的工具。Lint-staged 仅仅是文件过滤器,不会帮你格式化任何东西。
(2)说明
当我们使用eslint校验代码或者prettier格式化代码的时候,会将本地的所有代码进行检测和格式化,我们期望的是:使用eslint和prettier工具的时候,只对我当前修改过的文件进行检验和处理,其他的文件我没改动,肯定不需要额外的处理,这样的话,会提升我们的开发效率,处于这个考虑,lint-staged是一个只对将要通过git提交的文件(staged),执行自定义脚本的工具。
(3)配置
- 在项目的根目录新增
**lint-staged.config.cjs** 文件新增lint-staged选项
jsxmodule.exports = {
  "*.{js,jsx,ts,tsx}": ["eslint --fix", "prettier --write"],
  "{!(package)*.json,*.code-snippets,.!(browserslist)*rc}": ["prettier --write--parser json"],
  "package.json": ["prettier --write"],
  "*.vue": ["eslint --fix", "prettier --write", "stylelint --fix"],
  "*.{scss,less,styl,html}": ["stylelint --fix", "prettier --write"],
  "*.md": ["prettier --write"]
};
(4)在 package.json 文件中添加一些相关的 npm 脚本,以便你可以在项目中运行 lint-staged。例如:
jsx"scripts": {
    "lint:lint-staged": "lint-staged"
  },
5、配置 Husky
(1)简介
在介绍 Husky 之前,我们需要先了解什么是钩子(Hook)。在前端开发中,Vue 框架提供了一系列生命周期钩子,例如 beforeCreated、created、beforeMounted、mounted 等函数,它们会在 Vue 实例化过程中有序地执行。
同样地,在 Git 中也存在一些钩子。其中,比较常用的有 pre-push、pre-commit、commit-msg 等。在这些钩子中,pre-commit 会在执行 commit 前触发,pre-push 会在执行 push 前触发,而 commit-msg 则会在执行 git commit 时触发。
简单来说,pre-commit 钩子会在你执行 commit 操作之前触发,而 commit-msg 则会在你输入提交信息时触发。这些钩子的存在,可以帮助我们在代码提交前进行一些自动化的检查和处理,从而提高代码的质量和规范性。
需要注意的是,默认情况下,所有钩子都是禁用的。在我们的应用中,主要会用到 pre-commit 和 commit-msg 这两个钩子。
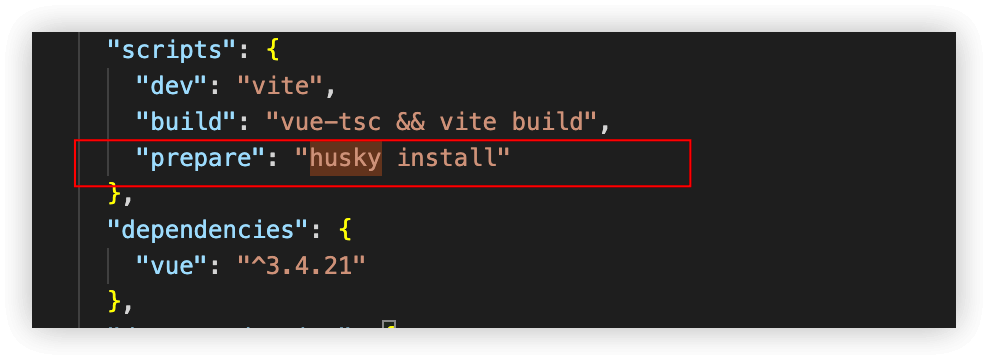
(2)添加一个script脚本到package.json
- 因为我们在上面已经安装依赖了,所以可以直接添加脚本
jsxnpm pkg set scripts.prepare="husky install"
此时会看到package.json自动生成了:
(3)生成.husky文件
在执行这一步之前,请确保你已经
**初始化了一个 Git 仓库**或者**与远程仓库进行了关联**。这是因为**Husky**是一个 Git 钩子工具,它需要在 Git 仓库中才能生效。如果你还没有初始化 Git 仓库或者与远程仓库进行关联,可以通过以下步骤进行操作:
1、如果你的项目还没有 Git 仓库,可以通过运行以下命令来初始化一个新的 Git 仓库:
jsxgit init
2、如果你的项目已经有了 Git 仓库,但是还没有与远程仓库进行关联,可以通过以下命令来添加远程仓库地址
jsxgit remote add origin <远程仓库地址>
3、接下来,就可以执行 npm run prepare 命令来生成 .husky 文件,让 Husky 在你的项目中生效了
jsxnpm run prepare
(4)开始配置
1、创建文件
- 打开终端,进入到你的项目根目录下。
- 执行以下命令创建
.husky文件夹,并在其中创建pre-commit和commit-msg文件:
jsxmkdir -p .husky && touch .husky/pre-commit && touch .husky/commit-msg
2、查看是否文件是有可执行权限的
- 你可以使用
ls命令查看文件的权限信息。打开终端,进入到你的项目根目录中执行以下命令:
jsxls -l .husky/pre-commit
ls -l .husky/commit-msg
这会显示文件的权限信息。如果文件具有可执行权限,你会在输出中看到 -rwxr-xr-x 或类似的权限字符串,其中 x 表示可执行权限。如果文件没有可执行权限,你会看到 -rw-r--r-- 或类似的权限字符串,其中没有 x。
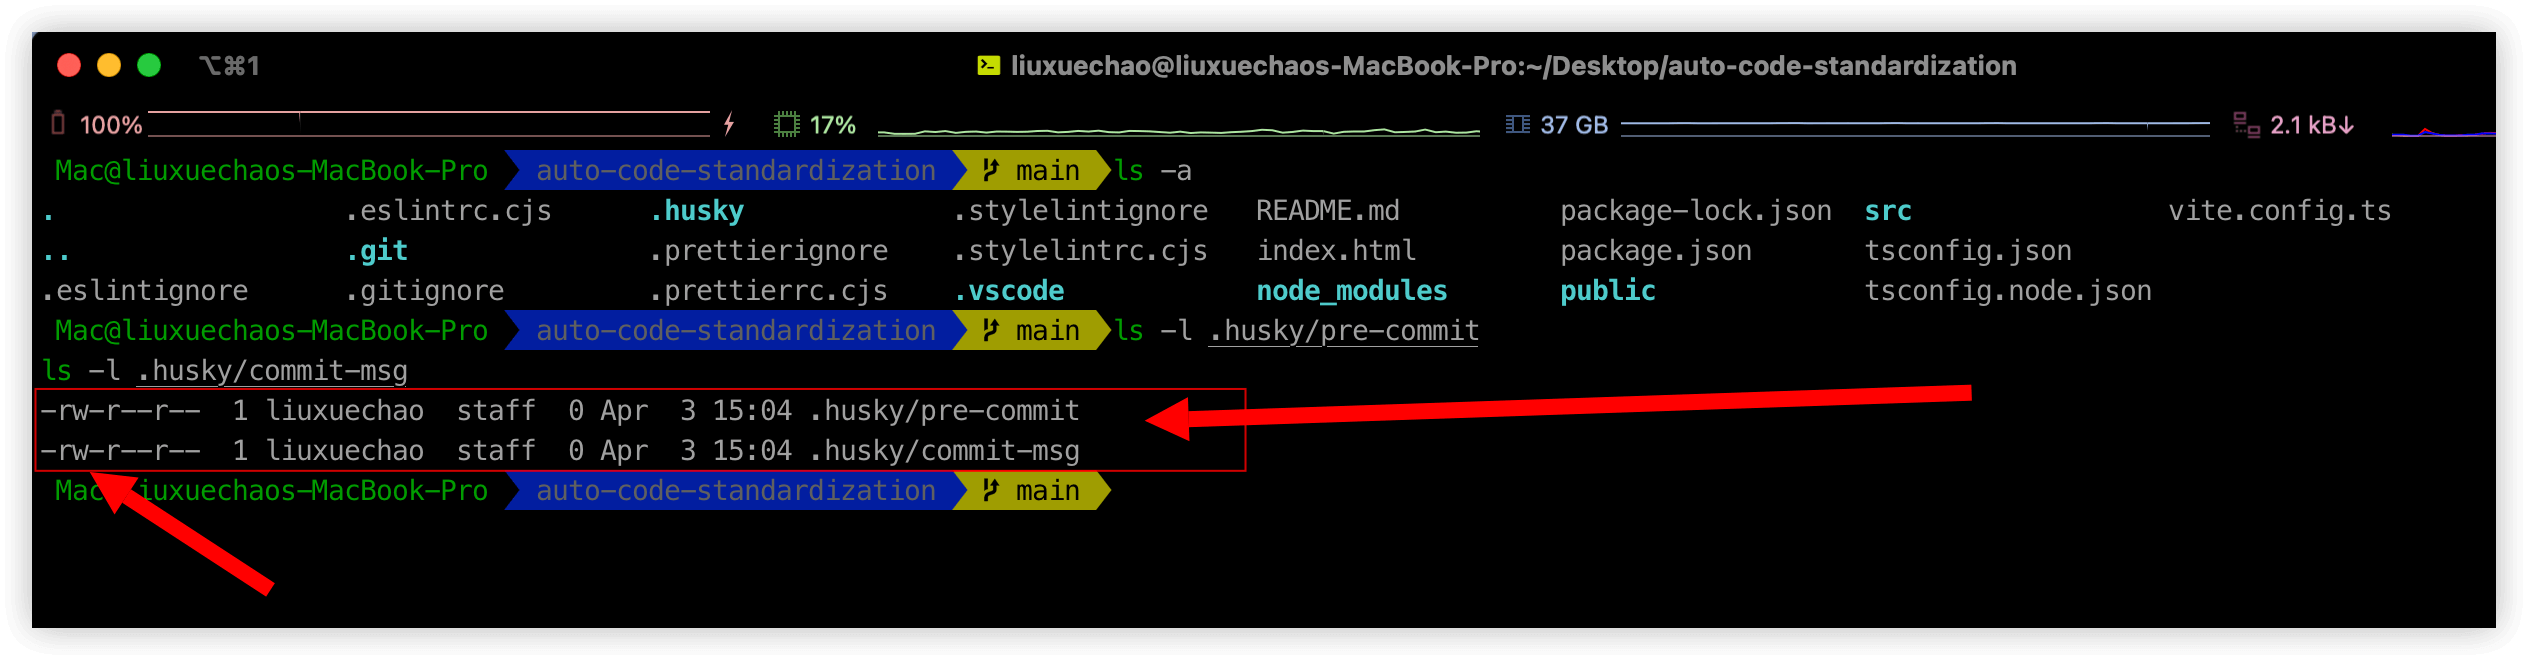
- 其中你会在输出中看到
**-rw-r--r—** 没有**x** 也就证明**没有可执行权限。**
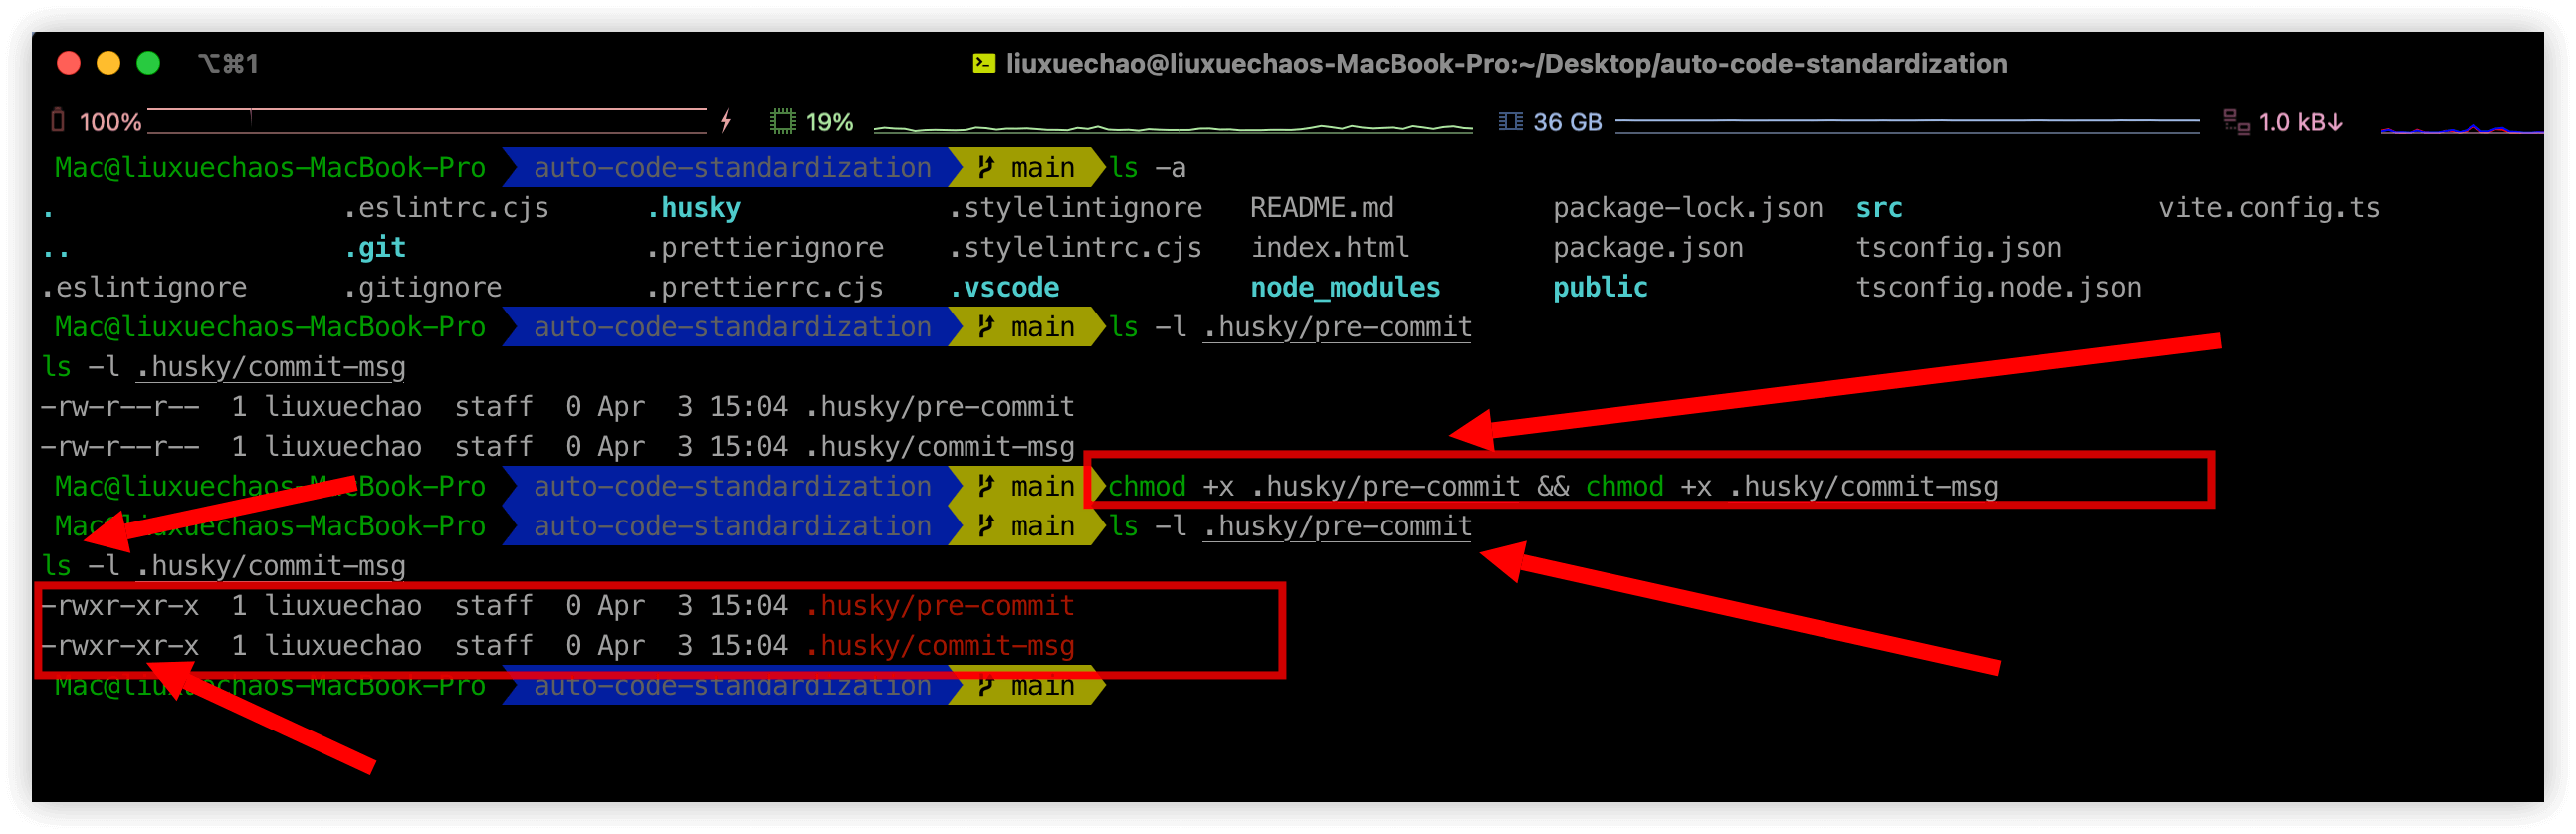
3、赋予可执行权限
jsxchmod +x .husky/pre-commit && chmod +x .husky/commit-msg
- 下面的图片中我们看到了执行了 赋予可执行权限 的命令后在查看是否文件是有可执行权限的时候发现它前面有
x啦。证明有权限了
4、配置使用husky的 pre-commit 钩子:
- 需求:
git commit之前的时候,我们将src文件夹下的以js、ts、vue等结尾的文件进行eslint检测,不合法则放弃暂存。(不自动修改) - 可以在
**pre-commit**文件中添加以下内容:
jsx#!/usr/bin/env sh
. "$(dirname -- "$0")/_/husky.sh"

npm run lint:lint-staged
- 在上述配置中,我们将
**pre-commit**钩子指向**lint-staged**,这将在提交前运行**lint-staged**来执行代码检查。
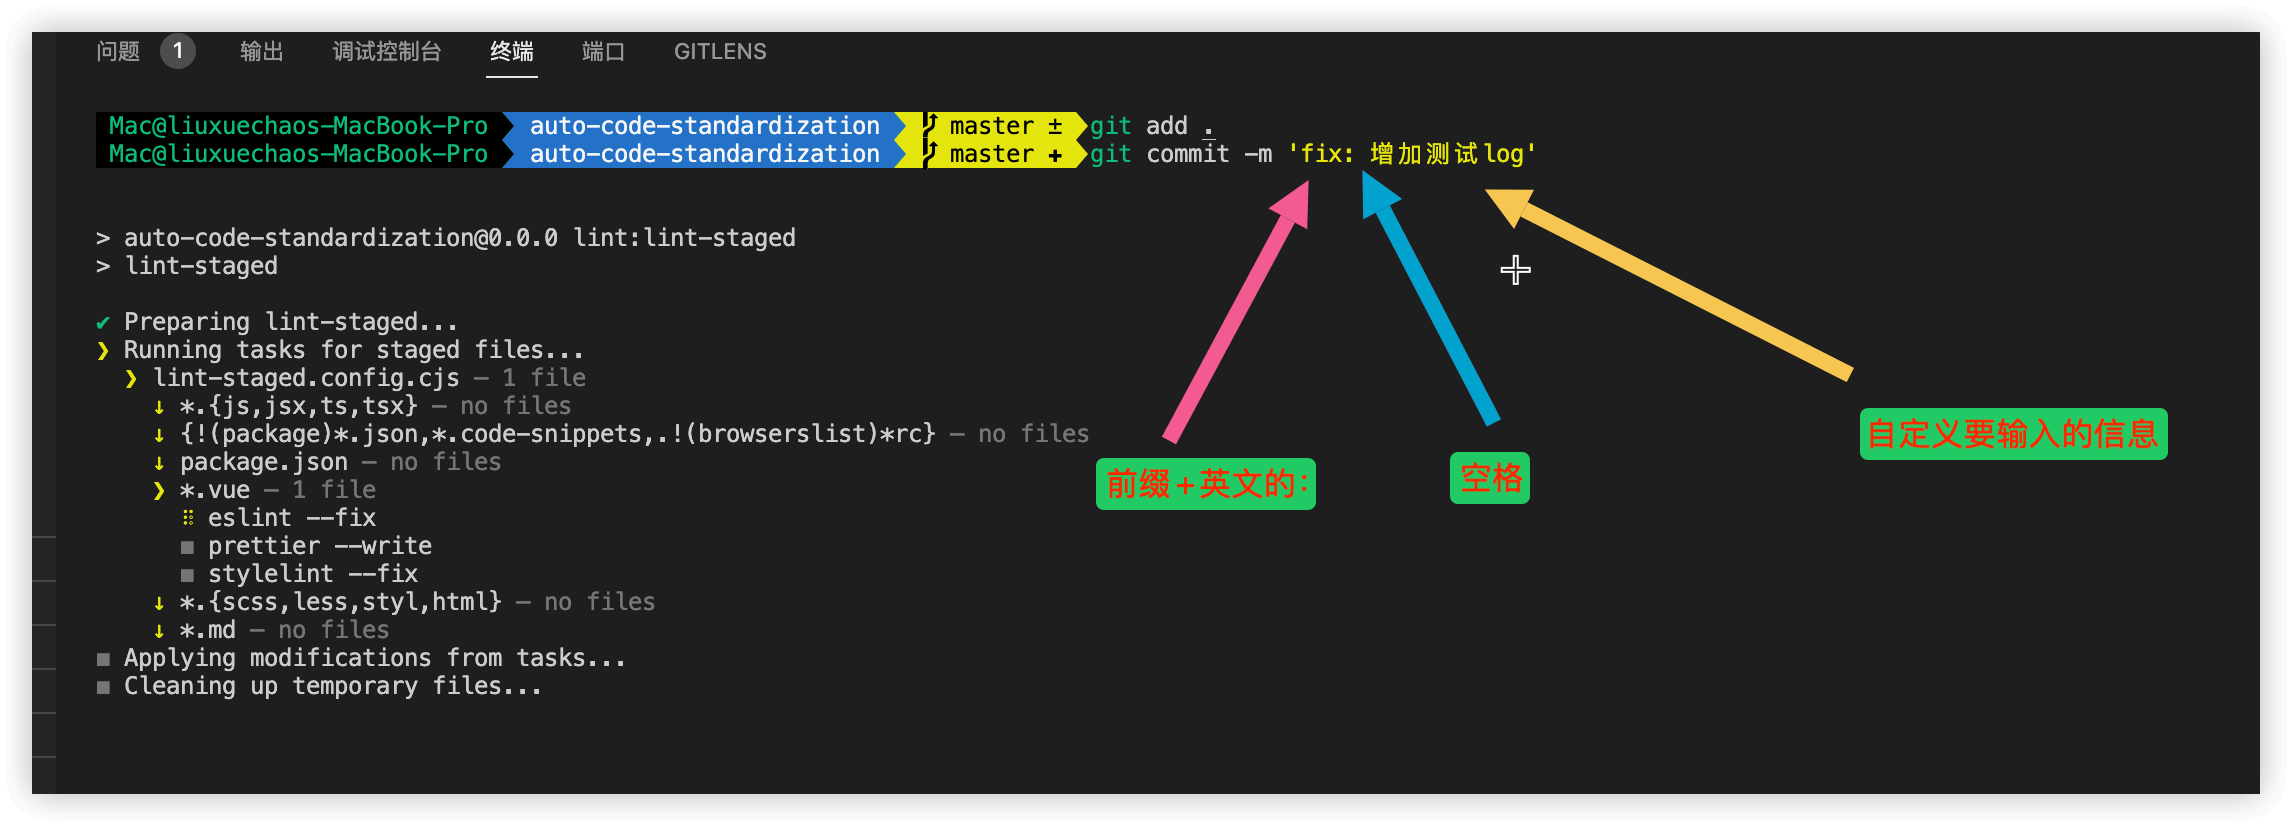
5、配置使用husky的 commit-msg 钩子
- 使用 Husky 的 commit-msg 钩子可以在执行
git commit -m "xxx"命令时触发,在这个时候,我们可以进行提交信息的校验工作。规范化的提交信息对于团队协作非常重要,它能够使提交信息清晰有序,方便后续的代码审查和版本管理。 - 规范化的提交信息应该包含以下部分:
**<type>[可选 scope]: <description>** type:表示提交的类型,例如新增(feat)、修改(fix)、更新(update)等。可选 scope:表示涉及的模块,是可选项。description:表示任务描述,描述了本次提交的具体内容。
示例:feat: 新增了一个搜索功能在首页。
通过规范化的提交信息,团队成员可以清楚地了解每次提交的目的和内容,提高了团队协作的效率和代码质量。
- 可以在
**pre-commit**文件中添加以下内容:
**npx --no-install commitlint --edit $1这个内容我提前配置了,因为它要基于Commitlint去执行下面的步骤有Commitlint的配置**
jsx#!/usr/bin/env sh
. "$(dirname -- "$0")/_/husky.sh"

npx --no-install commitlint --edit $1
- 在上述配置中,我们将
**commit-msg**钩子指向**commitlint**,这将在提交前运行**commitlint**来执行代码检查。
6、配置 Commitlint
(1)配置commitlint.config.cjs
- 在项目根目录下创建
.commitlint.config.cjs文件,并配置Commitlint规则:
jsx// @see: https://cz-git.qbenben.com/zh/guide
const fs = require("fs");
const path = require("path");

const scopes = fs
  .readdirSync(path.resolve(__dirname, "src"), { withFileTypes: true })
  .filter(dirent => dirent.isDirectory())
  .map(dirent => dirent.name.replace(/s$/, ""));

/** @type {import('cz-git').UserConfig} */
module.exports = {
  ignores: [commit => commit.includes("init")],
  extends: ["@commitlint/config-conventional"],
  rules: {
    // @see: https://commitlint.js.org/#/reference-rules
    "body-leading-blank": [2, "always"],
    "footer-leading-blank": [1, "always"],
    "header-max-length": [2, "always", 108],
    "subject-empty": [2, "never"],
    "type-empty": [2, "never"],
    "subject-case": [0],
    "type-enum": [
      2,
      "always",
      [
        "feat",
        "fix",
        "docs",
        "style",
        "refactor",
        "perf",
        "test",
        "build",
        "ci",
        "chore",
        "revert",
        "wip",
        "workflow",
        "types",
        "release"
      ]
    ]
  },
  prompt: {
    messages: {
      type: "Select the type of change that you're committing:",
      scope: "Denote the SCOPE of this change (optional):",
      customScope: "Denote the SCOPE of this change:",
      subject: "Write a SHORT, IMPERATIVE tense description of the change:\n",
      body: 'Provide a LONGER description of the change (optional). Use "|" to break new line:\n',
      breaking: 'List any BREAKING CHANGES (optional). Use "|" to break new line:\n',
      footerPrefixsSelect: "Select the ISSUES type of changeList by this change (optional):",
      customFooterPrefixs: "Input ISSUES prefix:",
      footer: "List any ISSUES by this change. E.g.: #31, #34:\n",
      confirmCommit: "Are you sure you want to proceed with the commit above?"
      // 中文版
      // type: "选择你要提交的类型 :",
      // scope: "选择一个提交范围(可选):",
      // customScope: "请输入自定义的提交范围 :",
      // subject: "填写简短精炼的变更描述 :\n",
      // body: '填写更加详细的变更描述(可选)。使用 "|" 换行 :\n',
      // breaking: '列举非兼容性重大的变更(可选)。使用 "|" 换行 :\n',
      // footerPrefixsSelect: "选择关联issue前缀(可选):",
      // customFooterPrefixs: "输入自定义issue前缀 :",
      // footer: "列举关联issue (可选) 例如: #31, #I3244 :\n",
      // confirmCommit: "是否提交或修改commit ?"
    },
    types: [
      {
        value: "feat",
        name: "feat:     🚀  A new feature",
        emoji: "🚀"
      },
      {
        value: "fix",
        name: "fix:      🧩  A bug fix",
        emoji: "🧩"
      },
      {
        value: "docs",
        name: "docs:     📚  Documentation only changes",
        emoji: "📚"
      },
      {
        value: "style",
        name: "style:    🎨  Changes that do not affect the meaning of the code",
        emoji: "🎨"
      },
      {
        value: "refactor",
        name: "refactor: ♻️   A code change that neither fixes a bug nor adds a feature",
        emoji: "♻️"
      },
      {
        value: "perf",
        name: "perf:     ⚡️  A code change that improves performance",
        emoji: "⚡️"
      },
      {
        value: "test",
        name: "test:     ✅  Adding missing tests or correcting existing tests",
        emoji: "✅"
      },
      {
        value: "build",
        name: "build:    📦️   Changes that affect the build system or external dependencies",
        emoji: "📦️"
      },
      {
        value: "ci",
        name: "ci:       🎡  Changes to our CI configuration files and scripts",
        emoji: "🎡"
      },
      {
        value: "chore",
        name: "chore:    🔨  Other changes that don't modify src or test files",
        emoji: "🔨"
      },
      {
        value: "revert",
        name: "revert:   ⏪️  Reverts a previous commit",
        emoji: "⏪️"
      },
      {
        value: "wip",
        name: "wip:      🕔  work in process",
        emoji: "🕔"
      },
      {
        value: "workflow",
        name: "workflow: 📋  workflow improvements",
        emoji: "📋"
      },
      {
        value: "type",
        name: "type:     🔰  type definition file changes",
        emoji: "🔰"
      }
      // 中文版
      // { value: "feat", name: "特性:   🚀  新增功能", emoji: "🚀" },
      // { value: "fix", name: "修复:   🧩  修复缺陷", emoji: "🧩" },
      // { value: "docs", name: "文档:   📚  文档变更", emoji: "📚" },
      // { value: "style", name: "格式:   🎨  代码格式(不影响功能,例如空格、分号等格式修正)", emoji: "🎨" },
      // { value: "refactor", name: "重构:   ♻️  代码重构(不包括 bug 修复、功能新增)", emoji: "♻️" },
      // { value: "perf", name: "性能:    ⚡️  性能优化", emoji: "⚡️" },
      // { value: "test", name: "测试:   ✅  添加疏漏测试或已有测试改动", emoji: "✅" },
      // { value: "build", name: "构建:   📦️  构建流程、外部依赖变更(如升级 npm 包、修改 webpack 配置等)", emoji: "📦️" },
      // { value: "ci", name: "集成:   🎡  修改 CI 配置、脚本", emoji: "🎡" },
      // { value: "revert", name: "回退:   ⏪️  回滚 commit", emoji: "⏪️" },
      // { value: "chore", name: "其他:   🔨  对构建过程或辅助工具和库的更改(不影响源文件、测试用例)", emoji: "🔨" },
      // { value: "wip", name: "开发:   🕔  正在开发中", emoji: "🕔" },
      // { value: "workflow", name: "工作流:   📋  工作流程改进", emoji: "📋" },
      // { value: "types", name: "类型:   🔰  类型定义文件修改", emoji: "🔰" }
    ],
    useEmoji: true,
    scopes: [...scopes],
    customScopesAlign: "bottom",
    emptyScopesAlias: "empty",
    customScopesAlias: "custom",
    allowBreakingChanges: ["feat", "fix"]
  }
};
修改提交信息为:feat: 修改配置文件,成功了!!,记住feat冒号后面一定要有一个空格,这算是一个坑吧。
上面会先经过pre-commit钩子执行eslint代码校验,然后经过commit-msg钩子校验提交信息合法后才提交到本地仓库。
7、配置 Commitizen
我们重点使用
**czg**
(1)简洁
什么是 commitizen:一个基于 Node.js 的
git commit命令行工具,可帮助生成标准化提交消息。 什么是适配器:替换commitizen 命令行工具的**交互式插件。 什么是cz-git:**一款工程性更强,轻量级,高度自定义,标准输出格式的 commitizen 适配器(插件) 什么是czg:czg :将其理解为内置cz-git适配器Commitizen CLI替代品(推荐使用这个)
(2)配置cz-git
- 只需要简单的三个步骤:
2.1、下载依赖
jsxnpm install -D cz-git
#本地全局安装 commitizen
npm install -g commitizen
2.2、修改 package.json 添加 config 指定使用的适配器
jsx{
  "scripts": {

  },
  "config": {
    "commitizen": {
      "path": "node_modules/cz-git"
    }
  }
}
2.3、添加自定义配置(可选,使用默认)
- 在项目的根目录中
commitlint.config.cjs中进行联动给予校验信息,所以可以编写于 commitlint 配置文件之中。 - 主要是增加
**/** @type {import('cz-git').UserConfig} */**这句话
jsx/** @type {import('cz-git').UserConfig} */
module.exports = {
  rule: {
    ...
  },
  prompt: {
    useEmoji: true
    //option...
  }
}
(3)配置czg
3.1、下载依赖
jsxnpm install -D czg
3.2、修改 package.json 添加 commit 脚本
jsx  "scripts": {
    "commit": "git add -A && czg && git push"
  },
三、使用
(1)使用配置好的czg可视化交互规范化的提交信息
现在,通过**配置好的czg**可以使用 npm run commit 命令来提交更改,并通过 Commitizen 的交互式界面选择规范化的提交信息。
视频链接
(2)提交规范
提交示范:git commit -m 'feat: 新增商品页查询功能’ 此处并非只能用
feat作为前缀,还能使用其他前缀
通过以上步骤,你的 Vite 项目将会集成 Prettier、ESLint、Stylelint 等工具,实现代码规范化与自动化。 仓库地址


本文作者:LiuXueChao
本文链接:
版权声明:本博客所有文章除特别声明外,均采用 BY-NC-SA 许可协议。转载请注明出处!